Continuous controls
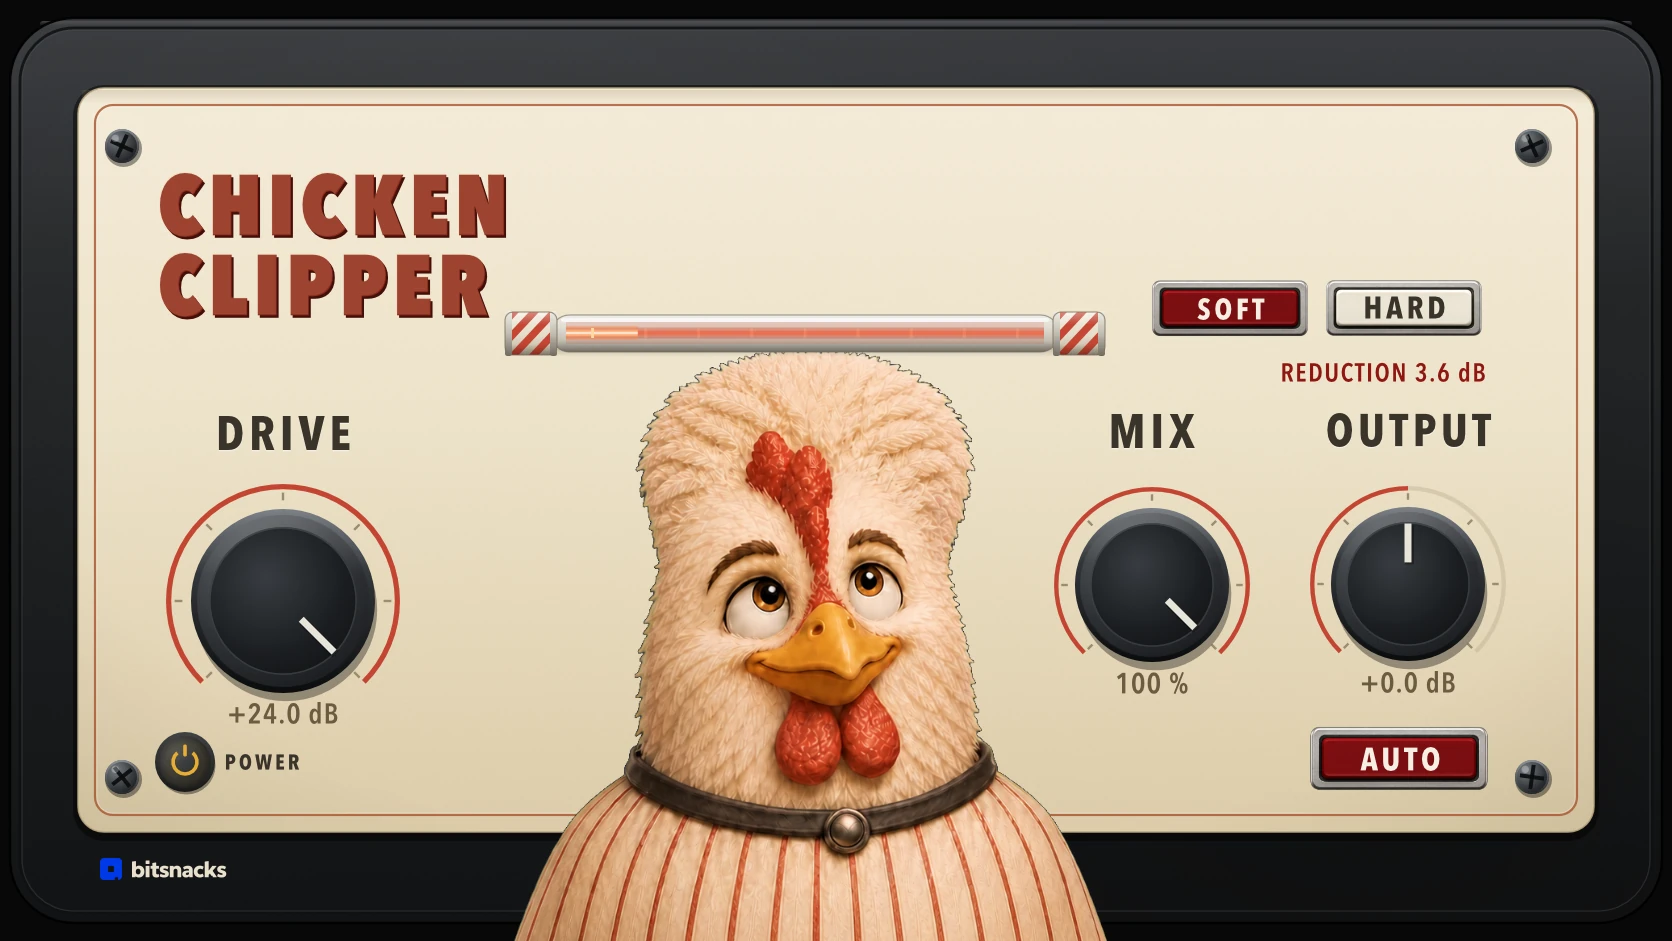
Drag vertically to adjust the Drive/Mix/Output controls. Hold Shift for finer movement. The value and unit remain visible during the gesture. Once a knob has focus, arrow keys adjust it in steps.
USER GUIDE · CHICKEN CLIPPER
Thank you for choosing the world’s most feather-conscious peak shaper.
Chicken Clipper is a focused mono or stereo effect for controlling peaks, adding clipping character and blending the result back into a track. The entire sound workflow stays on one surface.
This guide covers Chicken Clipper 0.1.16 for macOS. Formats: CLAP / VST3 / Audio Unit. Check current availability before installing.
FIRST INSERT
Before opening your DAW, sign in to your bitsnacks account and start the full 14-day trial in Bitsnacks Vending Machine. Install Chicken Clipper there, then restart your DAW to scan the plug-in.
Insert the plug-in on a mono or stereo track. A fresh instance opens powered, fully wet, in Soft mode, with Drive and Output at 0.0 dB and Auto active.
Turn Drive up until the peaks become denser or the desired edge appears. Watch the chicken approach the fixed guide and use the reduction readout once contact begins.
Use Soft for a rounded transition. Choose Hard for a firmer clipping edge.
Lower Mix when the fully processed signal is too strong. The dry and processed paths remain time-aligned.
Leave Auto active to compensate Drive, then use Output to trim the processed signal before Mix. Compare through Power at a similar listening level.
PANEL OPERATION
Drag vertically to adjust the Drive/Mix/Output controls. Hold Shift for finer movement. The value and unit remain visible during the gesture. Once a knob has focus, arrow keys adjust it in steps.
Shape selects Soft or Hard. Auto and Power show their current On or Off state directly on the panel.
Double-click a knob to reset it: Drive and Output return to 0 dB; Mix returns to 100 percent.
REDUCTION measures the shaping curve in decibels. Output trim and final peak protection are excluded. Check the final level with a meter after the plug-in.
CLIPPING CHARACTER
Soft curves into clipping progressively. Use it when the transition itself should contribute saturation or when a dense source needs a gentler edge.
Hard clips abruptly at the shaping boundary. Transients meet the boundary more directly, and sustained reduction brings the square feather treatment to the guide.
GAIN AND BLEND
Drive adds 0 to +24 dB before the shaping curve. Mix blends the processed signal with the time-aligned dry input across 0 to 100 percent.
A lower Mix value is useful for parallel peak control on drum and bass sources, plus buses. Return to 100 percent when the clipped path should carry the complete signal.
Auto compensates Drive by the same number of decibels in Soft and Hard, including while Drive is automated. Programme loudness does not change that compensation. Output trims the processed path across -12 to +12 dB before Mix.
Your Output setting stays available with Auto on and remains unchanged when Auto is switched off. The chicken grows or shrinks slightly with Output and keeps its original size at 0 dB.
OUTPUT PEAKS
With Power on, Mix at 100 percent and Output at 0 dB, Soft and Hard keep output samples at or below 0 dBFS after the controls have settled. These limits apply while processing is active.
Negative Output lowers the ceiling; positive Output raises it by the selected gain. Auto can reduce the level further.
Dry Mix and Power Off can restore peaks above the ceiling. At 0 percent Mix or with Power off, the original signal passes through with its timing compensated.
Gain, EQ or other processing after Chicken Clipper can raise peaks again. Measure at the point whose level you need to control.
MIX DECISIONS
Raise Drive until the transient shape or saturation reaches the useful point. Stop when added level begins to hide the change you wanted.
Compare Soft and Hard on the same phrase. Pick the curve whose onset fits the source.
Lower Mix below 100 percent when the original attack or body needs to return.
Use Output for the last level correction, then switch Power to compare the complete effect through the latency-stable dry path.
HOST CONTROL
The complete Power/Drive/Shape/Mix/Output/Auto set is available to the host. Record or draw automation with the parameter names shown by your DAW.
The plug-in stores all six controls with the project. Visual meter position and feather motion are live indicators rather than saved sound values.
Keep the same plug-in format when moving a session between Macs. Logic Pro uses Audio Unit; Cubase uses VST3. An existing CLAP session continues to use CLAP.
The plug-in reports 118 samples of latency, about 2.46 ms at 48 kHz. This delay stays constant when you change controls or switch Power off. Power returns time-aligned dry audio and preserves the saved controls.
RECOVERY
Open Bitsnacks Vending Machine and run Repair for Chicken Clipper. Restart the host so it scans the restored plug-in formats.
Read the licence notice in the editor. Open Chicken Clipper in Bitsnacks Vending Machine to repair the device licence or check the trial expiry.
Check any licence notice and confirm processing is active. Set Power on, Mix to 100 percent and Output to 0.0 dB. Clear any held peak reading and replay the passage. Check whether the meter shows sample peaks or true peaks, and whether later processing adds gain.
Drive sets the chicken's position in both the website tour and the installed plug-in. Live reduction lights the barber line and triggers Hard feathers, so those details follow your audio.
STILL STUCK?
Include your macOS and DAW versions, Chicken Clipper version, sample rate and settings. Add the shortest sequence that shows the problem.